JUnit简介
一、简介
JUnit是由Erich Gamma和Kent Beck编写的一个回归测试框架,大多数开源框架都使用JUnit进行单元测试。
单元测试中的”单元”是指一个能独立完成一件事情的方法,这个方法不依赖上下文的影响。举例如下:
public class Math{
	public int multi(int m, int n){
		return m * n;
	}

	public int div(int m, int n){
		return m / n;
	}
}
上述代码中的multi()和div()方法可以看作不同的单元。
public class Math(){
	private int m = 0;
	private int n = 0;
	public void setValue(int m, int n){
		this.m = m;
		this.n = n;
	}
	public int multi(){
		return m * n;
	}
	public int div(){
		return m / n;
	}
}
上述代码中的multi()和div()方法不可以单独作为单元,因为它依赖于setValue方法给m和n赋值。
二、使用
1、下载junit.jar
2、常用注解
JUnit4使用@Before和@After注解分别来标识初始化和销毁的方法,使用@Test注解来标识需要测试的方法,在测试方法中要编写断言。
常用注解如下:
- @Before
使用此注解标识的方法在每个测试方法执行之前都会执行一次。
- @After
使用此注解标识的方法在每个测试方法执行之后都会执行一次。
@Before和@After标识的方法只能各有一个。
- @Test(expected=*.class)
使用此注解标识一个方法为测试方法。在JUnit4之前,对错误的测试只能通过fail()来产生一个错误,并在try块中用assertTrue(true)来测试,现在可以使用expected属性,该属性值是一个异常的类型。
- @Test(timeout=xxx)
使用此注解标识一个方法为测试方法。使用timeout属性指定超时时间(毫秒),如果测试方法在设置的时间内没有运行完,则测试失败。
- @Ignore
使用此注解标记的方法在测试中会被怱略,当测试的方法还没有实现或测试的方法已经过时时,可以用此注解标识。还可以为此注解传递一个String类型的参数,表明为什么会怱略这个测试方法,例如:@Ignore(“该方法已过时”)
3、常用断言
- assertEquals(expected, actual)
检查实际值(actual)是否与期望值(expected)相等;如果是比较两个对象是否相等,则使用对象的equals()方法判断。
- assertSame(expected, actual)
检查两个对象是否相等,使用内存地址判断。
- assertNotSame(expected, actual)
检查两个对象是否不相等,使用内存地址判断。
- assertNull(object)
检查一个对象是否为空。
- assertNotNull(object)
检查一个对象是否不为空。
- assertTrue(condition)
检查布尔条件的值是否为真。
- assertFalse(condition)
检查布尔条件的值是否为假。
4、示例
public class Math{
	public static int multi(int m, int n){
		return m * n;
	}

	public static int div(int m, int n){
		return m / n;
	}
}
其单元测试代码如下:
public class TestMath{
	private int m = 0;
	private int n = 0;

	//初始化方法
	@Before
	public void init(){
		this.m = 8;
		this.n = 2;
	}

	//测试方法
	@Test
	public void multi(){
		assertEquals(16, Math.multi(m, n));
	}

	//测试方法
	@Test
	public void div(){
		assertEquals(4, Math.div(m, n));
	}

	//销毁方法
	@After
	public void destory(){
		this.m = 0;
		this.n = 0;
	}
}
Run As -- JUnit Test结果:

命令行下运行:
java -cp .;../lib/junit-4.11.jar;../lib/hamcrest-all-1.3.jar org.junit.runner.JUnitCore com.junit.TestMath
5、TestSuite
如果有多个测试类,一个一个地执行可能会耗费不少时间,可以使用TestSuite来一次执行多个测试类:
public class TestAll{
	public static Test suite(){
		TestSuite suite = new TestSuite("All Unit Tests");
		//添加测试类
		suite.addTest(new JUnit4TestAdapter(TestMath.class));
		//suite.addTest(...);
		return suite;
	}
}
三、在Spring中使用JUnit4
在Spring3框架中使用JUnit4,除Spring.jar和junit.jar之处,还需要添加spring-test.jar和commons-logging.jar。
- 示例
applicationContext-service.xml:
<?xml version="1.0" encoding="UTF-8"?>
<beans xmlns="http://www.springframework.org/schema/beans"
    xmlns:xsi="http://www.w3.org/2001/XMLSchema-instance"
    xmlns:aop="http://www.springframework.org/schema/aop"
    xmlns:context="http://www.springframework.org/schema/context"
    xsi:schemaLocation="http://www.springframework.org/schema/beans
        http://www.springframework.org/schema/beans/spring-beans.xsd
        http://www.springframework.org/schema/context
		http://www.springframework.org/schema/context/spring-context-2.5.xsd
        http://www.springframework.org/schema/aop
        http://www.springframework.org/schema/aop/spring-aop-2.5.xsd">

	<context:annotation-config/>
    <bean id="sampleService" class="com.junit.SampleServiceImpl"></bean>

    <bean id="dataSource" class="org.apache.commons.dbcp.BasicDataSource">
		<property name="driverClassName" value="com.mysql.jdbc.Driver"></property>
		<property name="url" value="jdbc:mysql://localhost:3306/test"></property>
		<property name="username" value="root"></property>
		<property name="password" value="666666"></property>
	</bean>

	<bean id="transactionManager" class="org.springframework.jdbc.datasource.DataSourceTransactionManager">
		<property name="dataSource" ref="dataSource"></property>
	</bean>
</beans>
相关Java类:
public class Sample {

}

public interface ISampleService {
	public List<Sample> getSamples();
}

public class SampleServiceImpl implements ISampleService{
	@Override
	public List<Sample> getSamples() {
		return new ArrayList<>();
	}
}
测试类:
@RunWith(SpringJUnit4ClassRunner.class)
@ContextConfiguration(locations={"/applicationContext-service.xml"})
public class ServiceTest extends AbstractTransactionalJUnit4SpringContextTests{
	//依赖注入
	@Resource(name="sampleService")
	private ISampleService service;
	//测试方法
	@Test
	public void getSamples(){
		List<Sample> samples = service.getSamples();
		Assert.assertNotNull(samples);
	}
}
Run As -- JUnit Test结果:

四、与Ant集成
JUnit可以与Ant集成使测试工作自动化。
1、Ant下载与安装
- 下载
下载地址:Apache Ant Download
- 安装
下载后解压,并配置系统环境变量:
ANT_HOME: F:\ProgramFiles\apache-ant

Classpath: %ANT_HOME%\lib;

Path: %ANT_HOME%\bin;
2、Ant配置简介
Ant通过XML文件来配置,通常XML中都要包含<project>和<target>两个元素。
-
project元素
-
name
项目名称
-
default
每个project都包含一个或多个target,一个target又包含一系列想要执行的task。使用Ant开始运行时,可以指定执行某个target,如果没有指定时则执行此属性中设置的默认target。
-
basedir
当前项目的基本路径,
.表示当前项目的根目录。
-
-
target元素
-
name
目标名称
-
depends
依赖的target
-
if
设置执行时的条件,满足此条件时执行
-
unless
设置执行时的条件,如果不满足此条件时则不执行
-
description
对目标(target)的描述
-
task
一小段任务
-
reference
引用,通过refid属性来引用在其他节点中定义的id
-
3、集成示例
- build.xml
<project name="MyProject" default="test" basedir=".">
	<description>junit ant integration</description>
	<!-- set global properties for this build -->
	<property name="src" location="src"/>
	<property name="build" location="build"/>
	<property name="report" location="report"/>

	<path id="required.classpath">
		<fileset dir="./lib">
			<include name="*.jar"/>
		</fileset>
	</path>

	<target name="init">
		<!-- Create the time stamp -->
		<tstamp/>
		<!-- Create the build directory structure used by compile -->
		<mkdir dir="${build}"/>
		<mkdir dir="${report}"/>
	</target>

	<target name="compile" depends="init" description="compile the source">
		<!-- Compile the Java code from ${src} into ${build} -->
		<javac srcdir="${src}" destdir="${build}" includeAntRuntime="false">
			<classpath refid="required.classpath"/>
		</javac>
	</target>

	<target name="test" depends="compile" description="junit test">
		<available property="classExist" file="${build}/com/junit/TestMath.class"/>
		<junit printsummary="yes" haltonfailure="yes">
			<!-- dependencies jars -->
			<classpath refid="required.classpath"/>
			<!-- TestMath classpath -->
			<classpath>
				<pathelement location="${build}"/>
			</classpath>

			<test name="com.junit.TestMath" if="classExist" todir="${report}">
				<formatter type="xml"/>
			</test>
		</junit>
		<junitreport todir="${report}">
			<fileset dir="${report}">
				<include name="TEST-*.xml"/>
			</fileset>
			<report format="frames" todir="${report}/html"/>
		</junitreport>
	</target>

	<target name="clean" description="clean up">
		<!-- Delete the ${build} and ${report} directory trees -->
		<delete dir="${build}"/>
		<delete dir="${report}"/>
	</target>
</project>
如果Build Failed可以使用ant test -d命令(debug),查看具体错误原因。
<test>标签中的todir属性为 report 的生成目录,在<junitreport>中会根据这些文件(TEST-xxx.xml)来生成报告。
如果相批量运行TestCase,则可以使用<batchtest>来替代<test>:
<batchtest todir="${report}">
	<formatter type="xml"/>
	<fileset dir="${build}">
		<include name="**/*TestMath.class"/>
	</fileset>
</batchtest>
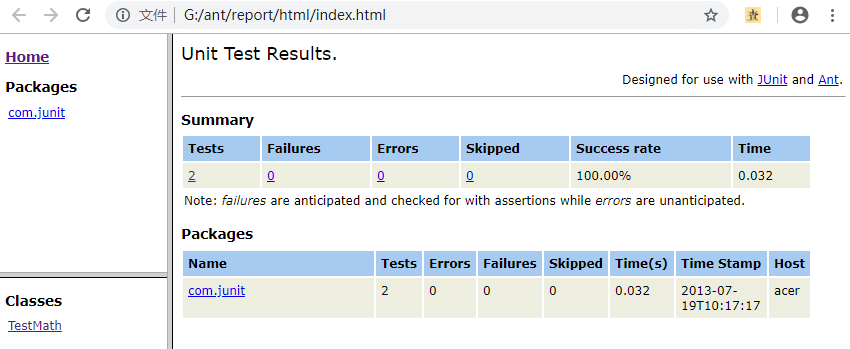
使用ant test命令开始运行,ant clean命令清除数据;报告结果如下:
附:
Maven Repository: Hamcrest All
Maven Repository: Spring TestContext Framework
Maven Repository: Spring Context