Zipkin简介
一、简介
1、概述
Zipkin是一款开源的分布式追踪系统,它可以收集和分析分布式系统中服务调用的耗时数据,直观地展示请求在微服务链路中的完整路径,快速定位性能瓶颈和问题根因。
2、核心概念
- Trace
Trace代表一次完整的请求链路,具有全局唯一的Trace ID;一个Trace由多个Span构成一棵树状结构。
- Span
Span代表一个服务内部的基本工作单元(例如一次方法调用),其中包含操作名称、时间戳、耗时情况等;Span之间通过Parent ID建立父子关系,形成调用链。
- Annotation
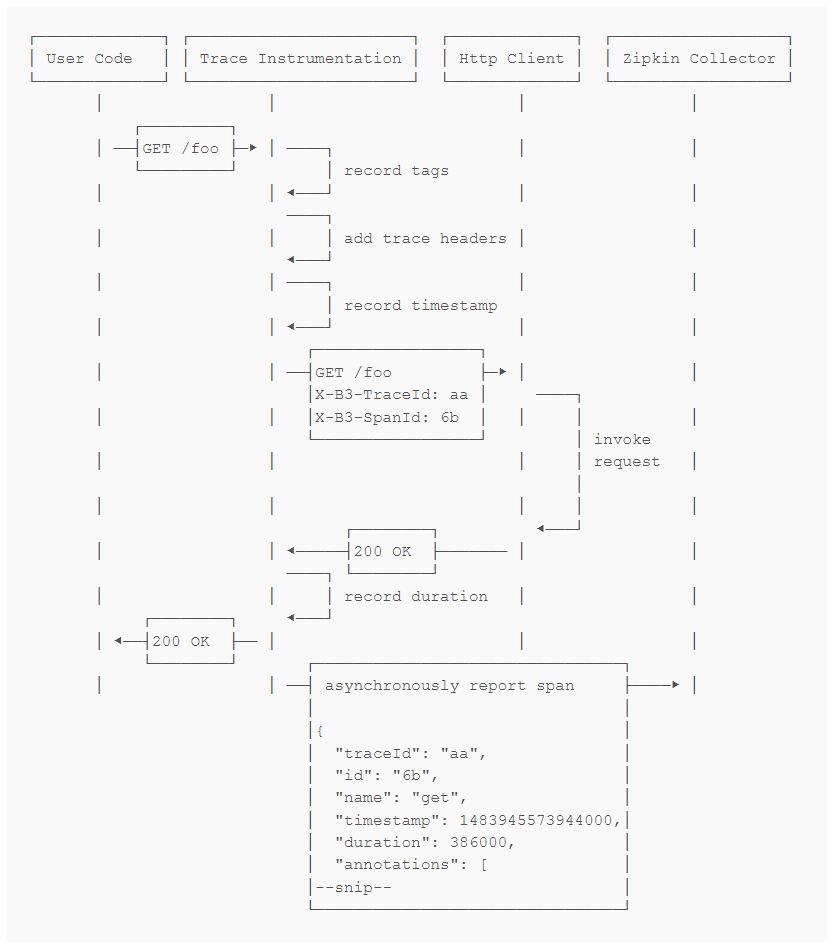
用于记录关键事件的时间点,主要包括cs, sr, ss, cr四种,可用来计算网络延迟和服务处理时间;属于Span的一部分。
| 注解 | 全称 | 含义 |
| cs | Client Sent | 客户端发起请求,标志着一个Span的开始 |
| sr | Server Received | 服务端接收到请求,准备开始处理 |
| ss | Server Sent | 服务端处理完成,并将响应发送回客户端 |
| cr | Client Received | 客户端成功接收到服务器的响应,标志着该Span的结束 |
- Tags
Tags是以键值对形式附加在Span上的自定义元数据(metadata),用于记录业务上下文,例如:HTTP方法、URL、状态码等;是Span的补充信息。
3、内部模块
- Collector
任何组件发送的Trace数据都会到达收集器守护程序处理。
- Storage
存储、索引和查找数据,支持Cassandra、ElasticSearch和MySQL。
- Search
搜索模块提供了一个简单的JSON API,用于查找和检索存储在后端的Trace数据;此API主要被Web UI使用。
- Web UI
用于查看Trace的UI界面。
4、工作流程
- 数据写入
使用集成了Zipkin的客户端(例如:Spring Cloud Sleuth)处理请求时,客户端会拦截调用,生成Trace和Span信息;这些数据会通过HTTP或消息队列(如Kafka, RabbitMQ) 等传输方式异步发送到Zipkin服务端的收集器(Collector)处理并存储。
- 数据存储与查询
Zipkin支持多种存储,包括内存(仅用于测试)、MySQL、Elasticsearch和Cassandra;生产环境推荐使用Elasticsearch以满足大规模数据存储和查询需求。存储的数据可以通过查询服务(Query Service)API进行检索,最终在Web UI上可视化展示。
下面是用户请求/foo资源的顺序图:
5、下载安装
下载之后使用java -jar运行:
java -jar zipkin-server-2.24.3-exec.jar
访问http://localhost:9411/zipkin/:
如果使用MySQL存储,可以使用以下命令启动:
java -jar zipkin-server-2.24.3-exec.jar --zipkin.storage.type=mysql --zipkin.storage.mysql.host=localhost --zipkin.storage.mysql.tcp.port=3306 --zipkin.storage.mysql.db=test --zipkin.storage.mysql.username=root --zipkin.storage.mysql.password=123456
启动之前需要在数据库中运行zipkin提供的建表脚本:
zipkin-master\zipkin-storage\mysql-v1\src\main\resources\mysql.sql
二、样例
1、pom.xml
<parent>
	<groupId>org.springframework.boot</groupId>
	<artifactId>spring-boot-starter-parent</artifactId>
	<version>2.7.18</version>
	<relativePath /> <!-- lookup parent from repository -->
</parent>

<dependencyManagement>
	<dependencies>
		<dependency>
			<groupId>org.springframework.cloud</groupId>
			<artifactId>spring-cloud-dependencies</artifactId>
			<version>2021.0.9</version>
			<type>pom</type>
			<scope>import</scope>
		</dependency>
	</dependencies>
</dependencyManagement>

<dependencies>
	<dependency>
		<groupId>org.springframework.boot</groupId>
		<artifactId>spring-boot-starter-web</artifactId>
	</dependency>

	<dependency>
		<groupId>org.springframework.cloud</groupId>
		<artifactId>spring-cloud-starter-zipkin</artifactId>
		<version>2.2.8.RELEASE</version>
	</dependency>

	<dependency>
		<groupId>org.springframework.cloud</groupId>
		<artifactId>spring-cloud-starter-sleuth</artifactId>
	</dependency>

</dependencies>
2、Java类
- 配置类
定义RestTemplate和采样方式为一直采样。
import org.springframework.boot.autoconfigure.condition.ConditionalOnMissingBean;
import org.springframework.context.annotation.Bean;
import org.springframework.context.annotation.Configuration;
import org.springframework.web.client.RestTemplate;

import brave.sampler.Sampler;

@Configuration
public class WebConfig {

	@Bean
	@ConditionalOnMissingBean
	public RestTemplate getRestTemplate() {
		return new RestTemplate();
	}

	@Bean
	public Sampler alwaysSampler() {
		return Sampler.ALWAYS_SAMPLE;
	}
}
- 服务一
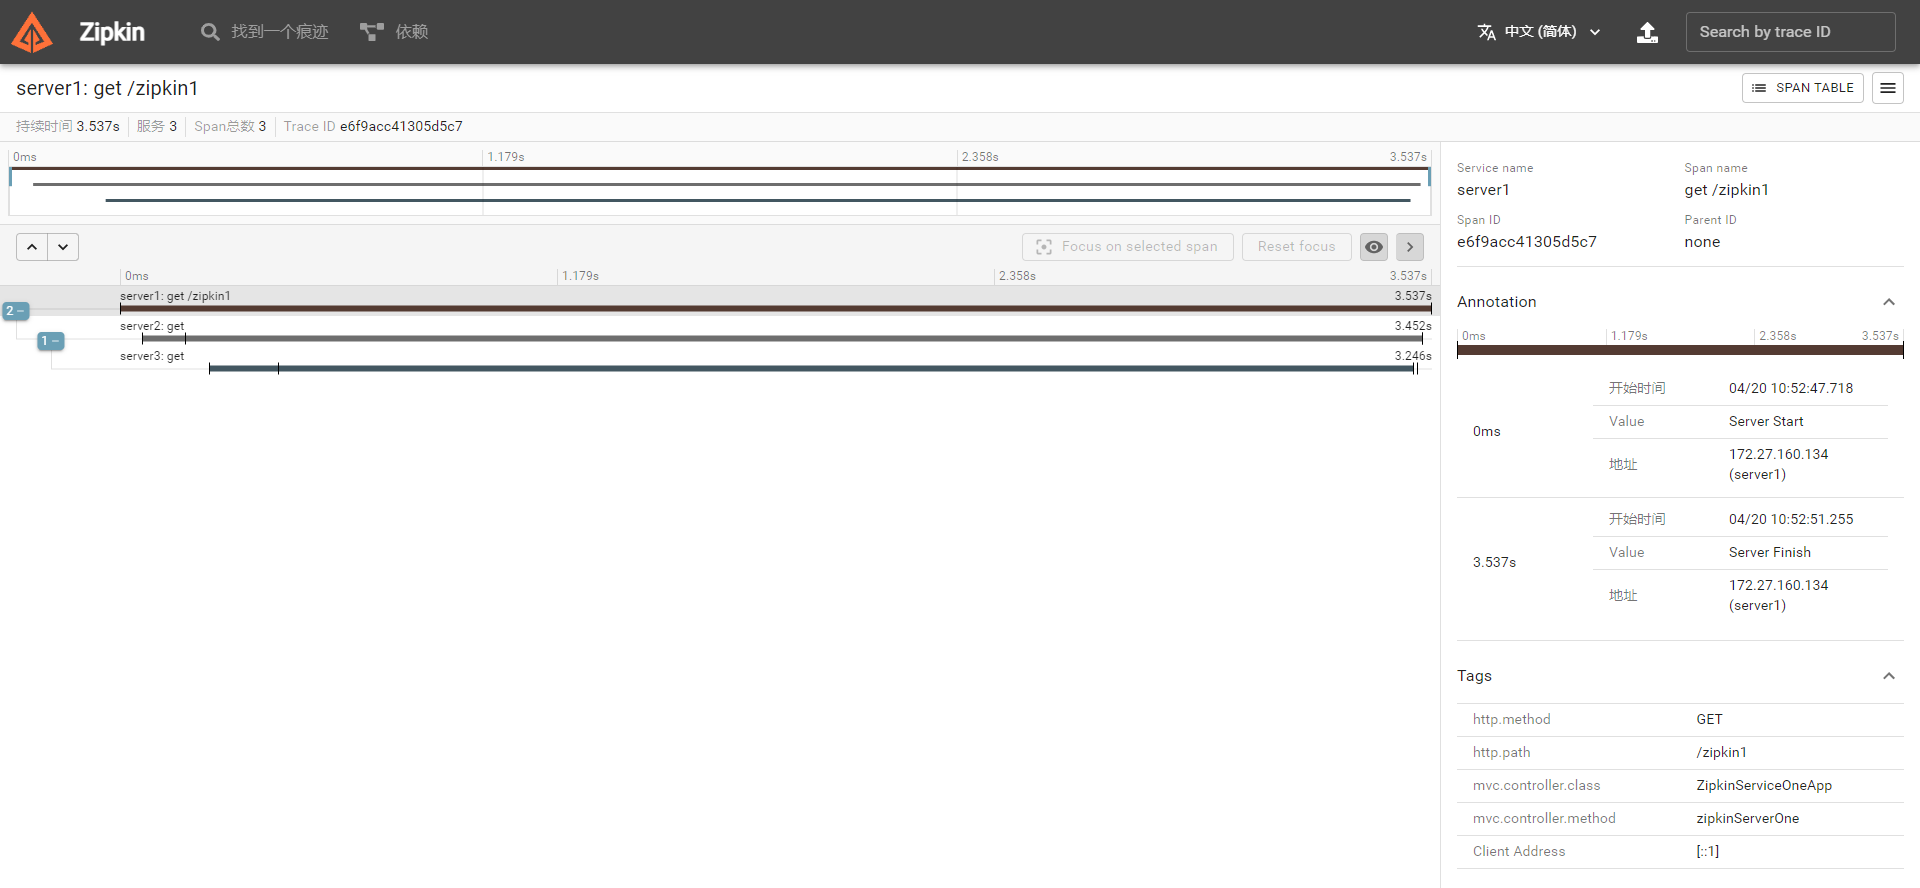
服务一运行在8081端口,访问/zipkin1时会调用服务二的服务/zipkin2。
import org.springframework.beans.factory.annotation.Autowired;
import org.springframework.boot.autoconfigure.SpringBootApplication;
import org.springframework.boot.builder.SpringApplicationBuilder;
import org.springframework.core.ParameterizedTypeReference;
import org.springframework.http.HttpMethod;
import org.springframework.web.bind.annotation.GetMapping;
import org.springframework.web.bind.annotation.RestController;
import org.springframework.web.client.RestTemplate;

@RestController
@SpringBootApplication
public class ZipkinServiceOneApp {

	@Autowired
	private RestTemplate restTemplate;

	public static void main(String[] args) {
		SpringApplicationBuilder builder = new SpringApplicationBuilder(ZipkinServiceOneApp.class);
		builder.properties("server.port=8081","spring.application.name=server1");
		builder.run(args);
	}

	@GetMapping(value="/zipkin1")
	public String zipkinServerOne() {
		System.out.println("zipkin service one...");
		String response = restTemplate.exchange("http://localhost:8082/zipkin2", HttpMethod.GET, null, new ParameterizedTypeReference<String>() {}).getBody();
		return "Service2 response: " + response;
	}
}
- 服务二
服务二运行在8082端口,访问/zipkin2时会调用服务三的服务/zipkin3。
import org.springframework.beans.factory.annotation.Autowired;
import org.springframework.boot.autoconfigure.SpringBootApplication;
import org.springframework.boot.builder.SpringApplicationBuilder;
import org.springframework.core.ParameterizedTypeReference;
import org.springframework.http.HttpMethod;
import org.springframework.web.bind.annotation.GetMapping;
import org.springframework.web.bind.annotation.RestController;
import org.springframework.web.client.RestTemplate;

@RestController
@SpringBootApplication
public class ZipkinServiceTwoApp {

	@Autowired
	private RestTemplate restTemplate;

	public static void main(String[] args) {
		SpringApplicationBuilder builder = new SpringApplicationBuilder(ZipkinServiceTwoApp.class);
		builder.properties("server.port=8082", "spring.application.name=server2");
		builder.run(args);
	}

	@GetMapping(value="/zipkin2")
	public String zipkinServerTwo() {
		System.out.println("zipkin service two...");
		String response = restTemplate.exchange("http://localhost:8083/zipkin3", HttpMethod.GET, null, new ParameterizedTypeReference<String>() {}).getBody();
		return "Service3 response: " + response;
	}
}
- 服务三
服务三运行在8083端口,服务执行时会sleep 3秒(模拟耗时)后返回Hello World。
import org.springframework.boot.autoconfigure.SpringBootApplication;
import org.springframework.boot.builder.SpringApplicationBuilder;
import org.springframework.web.bind.annotation.GetMapping;
import org.springframework.web.bind.annotation.RestController;

@RestController
@SpringBootApplication
public class ZipkinServiceThreeApp {

	public static void main(String[] args) {
		SpringApplicationBuilder builder = new SpringApplicationBuilder(ZipkinServiceThreeApp.class);
		builder.properties("server.port=8083", "spring.application.name=server3");
		builder.run(args);
	}

	@GetMapping(value="/zipkin3")
	public String zipkinServerThree() {
		System.out.println("zipkin service three...");
		try {
			Thread.sleep(3000);
		} catch (InterruptedException e) {
			e.printStackTrace();
		}
		return "Hello World!";
	}
}
3、运行
分别启动服务一、服务二、服务三后,访问:http://localhost:8081/zipkin1,大概等待3秒后可以看到响应:
Service2 response: Service3 response: Hello World!
在Zipkin Web UI中查询,可以看到请求的调用情况以及每个请求的耗时情况: